Sunday, December 22, 2013

Chocolate Crackles


 I remember the first time I ever made chocolate crackles, I was in Florida at my grandparent's condo. I had seen the recipe in a magazine on the flight down. I have this "tradition" that when I fly, I always buy a few magazines for the flight. And I remember (or at least I think I can remember this correctly) this was an US Weekly Magazine and the recipe was from Lauren Conrad. Now, this was probably around seventh or eighth grade, so anything Lauren Conrad had to be good, even now she's pretty awesome...her wardrobe!


I am pretty sure the recipe I used the first time I made chocolate crackles used oil and my mom was all about how these would be great because they didn't have too much fat. She really wanted me to make these and well I did. Years, later I don't know where that original recipe is, but I have created my own! Unfortunatley fortunately, they are made with butter!


 Chocolate Crackles
Ingredients:
½ Cup semi-sweet chocolate chips
¼ Cup (½ stick) unsalted butter, softened
1 Cup sugar
1 Large egg
¼ teaspoon mint extract
2 teaspoons baking powder
1 teaspoon salt
1 ¼ Cup flour
¼ Cup cocoa powder
¼ Cup milk
Powdered sugar for rolling

Directions:
1.     In a large microwave safe bowl, melt chocolate chips and butter at 30-second intervals, about 2-3 times. Stir in sugar. Then stir in sugar and mint extract.
2.     Gently stir in baking powder, salt, flour, and cocoa powder. Mix in milk.
3.     Refrigerate dough for at least 30 minutes, preferably 1 to 2 hours.
4.     When ready to bake, pre-heat oven to 350 degrees F. Place powdered sugar in a small bowl.
5.     Scoop cookie dough with a small cookie dough scoop. Shape dough into a ball, roll in powdered sugar and place on cookie sheet. Bake for 12-13 minutes. Let cool for 5 minutes on baking sheets.

Recipe By Molly

Print Recipe Here


Wednesday, December 18, 2013

Gift Guide 2013


Yup, I am going to do a gift guide even though all the polite and timely bloggers did theirs weeks ago and by now you are probably done your holiday shopping! Well I am not and here's to those like me who haven't quite wrapped it all up yet (pun intended)! Or haven't finished shopping yet...who me?!

Since this is late, here is a little tip if you can't get your gifts shipped in time! Print out a picture of the gift, then wrap it in a small box maybe with some rocks or weights, and then put that box in a bigger box, and continue until you feel content. Then on Christmas morning watch your loved one's face light up when they see a big box, and then you watch excitedly as they open box upon box. I have been on the receiving end of this...

Or if you're not into that, sign up for Amazon Prime, they give you a free 30 day trial! Amazon Prime gives you free two day shipping on everything you order! With it, you still have 5 days to order and get it in time for Christmas!

Electronics:

Beats Solo Headphones I have Beats Solo for studying and I adore them! They block out extraneous noises around you, but you can still hear what needs to be heard, like a fire alarm! They are pricey, but these will outlast the dozens of pairs you would by in place of these, and the total probably comes out to be about the same!


Shark Rocket Vacuum Looking for a new vacuum? I just got one of these and whoa does this one have power without bulk! This one PULLS me across the carpet sometimes and picks up tons of dust!


Samsung  32-Inch Smart LED HDTV I am in love with this TV. It is a smart TV, so no need for extra boxes to access Hulu and Netflix, it's all on there! There is even a workout channel, but I haven't checked that out yet... Again this is pricey, but would be great as a family present for all to enjoy!


Canon EOS 60D DSLR Camera This is the camera I have used for my blog pictures since last December and I cannot recommend it enough!! Pictures are crystal clear. If I could figure how to change the aperture so can you!


Kitchen Gifts:

Bodum Electric Water Kettle Boils water in minutes! Great for piping hot tea or oatmeal in the morning!


Silpat Non-Stick Baking Mats A baking must! I always use these when making cookies! I have never had a problem with sticking and they are eco-friendly because you don't need to use new parchment paper each time!


KitchenAid Classic Mixing Bowls I have TWO sets of these! They're my go-to bowls when I am baking! I use the smaller one for wet ingredients and the larger ones for dry! They're durable enough to be used with an electric hand-mixer!


OXO Good Grips Cherry Pitter It may not be cherry season, but this is not just for cherries, it can be used to pit olives too! This makes cherry pitting painless, trust me I was able to pit two pounds of cherries with my hand that was all bandaged up after the dog bite! And I had no trouble at all!


Perfect Beaker with Seal I learned about this at the King Arthur Flour Baking Class that I took and it is my favorite for measuring all my liquids!


Tovolo Silicone Spatula These are heat resistant up to 600 degrees F! So, I cook scrambled eggs with mine! They are also useful when scraping down mixing bowls and getting every last drop out of them!


Cuisinart Smart Stick 2-Speed Immersion Hand Blender I use this to smooth out tomato sauces, cranberry sauces and soups! I even use it to make milkshakes because I don't have a real blender! And my milkshakes totally bring all the boys to the yard!

DIY/Homemade Gift Ideas: 

DIY Almond-Brown Sugar Lip and Hand Scrub

Make cookie dough and festively package it! Or even dry mixes in jars!

Homemade fancy salts, spice rubs, or infused oils!

Geode bottle stoppers! Impress anyone with your crafting skills!

Check out my pinterest boards for more ideas and cute wrapping!

Charitable Giving:

The Mocha Club is an organization that helps Africa through donations and the goods sold in their shop!

Nets For Life also benefits Africa (my sister is currently in Africa and so it is a place close to my heart) by providing mosquito nets to people to prevent malaria.

fashionABLE sells scarves and leather products made by African women, helping them to change their lives for the better!


Now, my for my wish list (I do not own these, just giving you an idea of want I would like Santa to bring me!)!

The Flavor Bible by Karen Page

3 Month Start Kit from Barre3 Because I have done diddly squat about exercising, and I need to do something!

Vitamix Blender A girl can dream right?

Fit Bit See above about exercising. Oh, and it tracks sleep!

Ice Milk Apron These aprons are stunning in their simplicity! I would want to wear it out of the house...


Contains Amazon Affiliate Links, but nothing is sponsored, these are products I own unless otherwise noted and I truly love and recommend! These companies do not know who I am, but if they would like to work with me, I would be over the moon...no seriously I will go pull out my moon bounce shoes from eighth grade and bounce around for days! 

Sunday, December 15, 2013

DIY Almond-Brown Sugar Lip and Hand Scrub


I think it was two years ago that I first heard of a "lip scrub" and I totally passed it off as unnecessary. Scrub my lips, um, for what reason? I can barely get myself to wash my face, forget I said that... Well, fast forward to now, this winter my lips are chapped as ever (and no, not for that reason, get your mind out of the gutter!)! Since, we are getting around the holidays, many DIYs have been floating around the interwebs and I keep seeing DIY lip scrubs among other beauty products. Finally, I got off my lazy bum and made one!


I didn't have high expectations for this scrub, but BOY OH BOY do I love it! Now I get giddy when I go to use my lip scrub! You scrub away all your dry skin, and then when you rinse it off with warm water the scrub melts into your skin and feels all buttery and smooth (my favorite part)! Not only does it make your lips super soft, but it tastes kind of good...inevitably some will get in your mouth! Not only can this be a lip scrub, but I decided to try it out on my hands and it was wonderful! After using the scrub just make sure to MOISTURIZE! 
Mix up a bigger batch, put it in cute containers, slap a ribbon on them and you have got yourself a sweet life present for anyone on your list! 


DIY Almond-Brown Sugar Lip and Hand Scrub 
Ingredients:
2 Tablespoons Brown Sugar
1 Tablespoon Almond Oil (Or Olive Oil)

Directions:
1. Combine almond oil and brown sugar, stir until thoroughly combined.
2. To use, place dime sized amount of scrub on finger and gently scrub lips for 15-30 seconds. Rinse lips off with warm water. Be sure to moisturize with lip balm afterwards. For hands, moisten hands with warm water, scrub hands with a quarter sized amounts for 30-60 seconds, and rinse off with warm water. Follow up with a moisturizing lotion!

Obviously, if you are allergic to any of the ingredients DO NOT USE this scrub! 

Sunday, December 8, 2013

Dutch Oven Bread


The extended title of this post should be: Super Easy Overnight 4-Ingredient Dutch Oven Bread. I have attempted to make Parker House Rolls twice, both failed miserably. Since then I have always been weary of yeast. If you have been reading my blog for awhile, you probably remember when I initially mentioned my issues with yeast. Well, I was able to overcome my fear of yeast when I made those delicious grilled pizzas! So, I decided to dig out my yeast and make some bread!
Watch out, it is getting steamy in here!
This bread is ridiculously easy. You measure, mix, let the dough rise overnight, shape it into a ball, let it rest, and bake it! I would highly recommend this as a bread for anyone who has never made bread or is weary of working with yeast. The only place you need to be careful is with the temperature of the water, feel free to use a thermometer and aim for around 100 to 110 degrees F. If not using a thermometer, you want the water to feel like warm bath water on your wrist.


Yeast and dough whisk provided by the amazing King Arthur Flour. Thank you!

Dutch Oven Bread
Ingredients:
3 Cups All-Purpose Flour
1 ½ teaspoon Salt
1 teaspoon Instant Yeast
1 ½ Cups Warm Water (100 – 110 degrees F)

Directions:
1.     In a large bowl, stir together flour, salt and yeast until thoroughly combined.
2.     Add in warm water, stirring with a dough whisk or wooden spoon until dough comes together. Do not over mix. Cover bowl with plastic wrap, cover with a kitchen towel. Let the dough rise for at least 8 hours, but up to 24 hours. The dough should double in size.
3.     After dough has risen and you are ready to bake, pre-heat oven to 450 degrees F.
4.     Flour hands and flour a clean surface; turn the dough out onto floured surface. Form the dough into a ball. Cover in plastic wrap and let the dough rest.
5.     Once the oven has pre-heated and while the dough is resting, place Dutch oven and lid in oven to pre-heat for 30 minutes.
6.     Place ball of dough, on piece of parchment, and carefully lower dough into pre-heated Dutch oven. Replace the lid on Dutch oven. Bake covered for 30 minutes. Bake uncovered for an additional 15 to 20 minutes or until golden and crusty. To check for doneness you can carefully lift up parchment and knock on the bottom of the bread, it should sound hollow when done. Let rest 10 minutes before eating. 


Recipe Adapted from The Baker Chick 

Wednesday, November 20, 2013

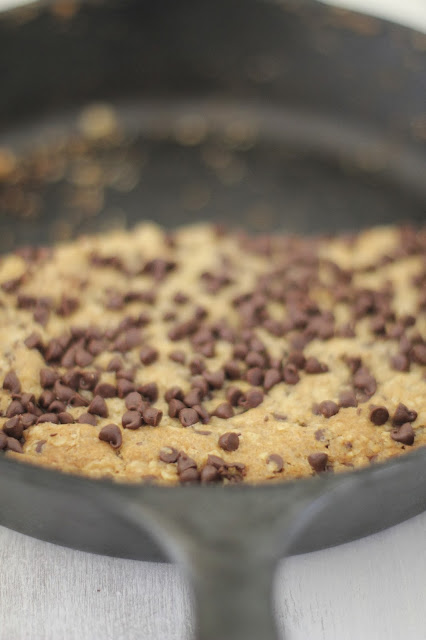
Oatmeal Chocolate Chip Skillet Cookie


I don't if I have shared this factoid with you, but when it comes to certain things I am kind of a germaphobe. And I find this buzzfeed article quite relatable (except for #12 and #16) and HILARIOUS.  So, what does my germaphobe confession have to do with this recipe? Well, it may take me a minute to get to that, but by then I think you will see the connection.


 Now the secret to a great cast iron skillet is it being well "seasoned". I had no idea what "seasoning" for a cast iron skillet was, so I looked it up. And basically, seasoning is when the pores in your skillet absorb oil/grease when the pan is heated. In order to maintain your seasoning, you need to keep your cast iron skillet as far way from the dish soap and dishwasher as possible because the harsh detergents strip the accumulated oil and grease from your skillet. Here is the germaphobe connection How do you wash your cast iron skillet you ask? In short you don't...at least not with soap and water. Instead you scrub your pan with a paper towel and some salt, which acts as an abrasive to remove cooked on food bits. After scrubbin' and saltin' your pan, you can rinse your skillet with JUST WATER and then quickly dry. To store, place a dishcloth over the skillet and cover if you have one (I don't).  To a germaphobe, this may seem repulsive because WHERE'S THE SOAP TO DISINFECT, well you don't need soap to disinfect! Salt "disinfects" the pan because salt kills germs, ever put salt on a slug? Proof is in the slug pudding. Also the pan is being used in the oven, meaning it is exposed to extreme temperatures, which also kill germs. If that isn't enough for you, then just don't cook meat in your pan, instead make delicious skillet cookies, and what do you know, I have a recipe for one right below!! 


Oatmeal Chocolate Chip Skillet Cookie
Ingredients:
1 teaspoon baking powder
1 cup all-purpose flour
½ teaspoon salt
pinch of cinnamon, optional
1 cup old-fashioned oats
1 cup mini chocolate chips (plus more for sprinkling over the top)
1 stick (½ cup) unsalted butter, softened
1 cup demerara sugar (or packed brown sugar)
1 egg
2 teaspoons vanilla extract


Directions:
1.     Preheat oven to 350 degrees F. Spray 10-inch skillet or 9-inch baking dish with non-stick spray.
2.     In a medium bowl, combine baking powder, flour, salt, cinnamon, old-fashioned oats, and chocolate chips. Set aside.
3.     In the bowl of a stand mixer with a paddle attachment, beat butter for 1-2 minutes until soft. Add in sugar and beat until light and fluffy, about 2-3 minutes. With the mixer on low, add in egg and vanilla extract, mixing until combined.
4.     Reduced the speed of the mixer, and slowly add in dry ingredients, increase speed just a bit, mixing until just combined.
5.     Transfer batter to prepared pan. Sprinkle extra chocolate chips on top if using. Bake for 30-35 minutes, the edges should be golden-brown and the middle should be starting to set.

Recipe by Molly Bakelette (YAY!!! MY FIRST ORIGINAL RECIPE HAPPY DANCE TIME)
Printer Friendly Recipe Here

You made it all the way through and are still reading! Go you! Bakelette really loves you now (I feel like that is something Elmo would say...)! Anyways, would you like me to do some how to posts? I have had a few ideas for some. I could start with seasoning/clean your cast iron skillet? Thoughts? 

Friday, October 25, 2013

Coconut Oil and Honey Pumpkin Bread


Things have been quiet on the Bakelette blogging front... a little too quiet if you ask me. (Insert truly sincere sorry that I do all too often for abandoning my dear readers.) When things get quiet on my blog, you can assume I am busy busy and I wish I was super organized and good at planning ahead so that I had a stock pile of pictures and recipes to post during these busy busy times. But as usual I don't.


Time management has never been my forte...and I am honestly trying to work on it. I have always had a planner, and I love it dearly, I sometimes just write completely superfluous tasks in it just because I like to write things in it. You would think that my love of my planner would mean I myself am a great "planner" and at looking ahead, but nope. Things are lacking in that department. It's funny, I can be so organized in certain aspects of my life, but when it comes to others its like a hurricane and typhoon whipped through leaving gigantic messes in its path. Throughout high school, I had one of the most organized lockers, but my room and workspace at home were always disastrous. Full disclosure my room and workspace are still a disaster. I wish I could just go upstairs right now and organize and clean my room in one go, but sometimes I can be a bit of a perfectionist and I have these grand ideas of organizing, dusting, sorting, and going through everything in my room all at once. IT DOESN'T WORK...at least for me. My brain just isn't wired that way, which I am fine with, but at times it can be extremely frustrating especially when I really want to clean my room, but I get overwhelmed by the task because of all that I want to accomplish at once. So, then I just try and avoid it. This also doesn't work. 
As usual this "story", if that is what you even want to call it, has no relation to the recipe. I find this blog is my outlet, where I can express things that I just haven't found any other outlet for. I think this post is just me trying to get some of the "clutter" in my brain out of my head and onto paper. Currently, I am trying to organize my life, focus on living a healthier lifestyle, and incorporate more positivity into my life. I feel like writing honest posts like these motivate me to change my life even more, and I don't mean to be preachy or anything, but I am just trying to be true to myself and to better myself. It just so happens that I have a blog and I am sharing bits of my real life with you. 


Coconut Oil and Honey Pumpkin Bread
Ingredients:
1 and ¼ Cup Whole-Wheat Pastry Flour
½ Cup All-Purpose Flour
1 teaspoon Baking Powder
½ teaspoon Baking Soda
¾ teaspoon Salt
1 Tablespoon Cinnamon
¼ teaspoon Cardamom (optional)
¼ teaspoon Cloves
Pinch of Ginger
1 and ¼ Cup Pumpkin Puree
½ Cup Coconut Oil, Melted
½ Cup Honey, Local Raw is best
2 Eggs

Directions:
1.     Preheat oven to 350 degrees F. Spray standard loaf pan with non-stick spray.
2.     In a medium bowl, stir together whole-wheat pastry flour, all-purpose flour, baking powder, baking soda, salt, cinnamon, cardamom, cloves, and ginger until well combined. Set aside.
3.     In another medium bowl, whisk together pumpkin, coconut oil, honey and eggs, until thoroughly combined.
4.     Add wet ingredients to dry, gently fold in wet ingredients until no more flour is visible. Be careful not to over mix, batter will be thick. Pour batter into prepared loaf pan. Bake 40 to 45 minutes, or until a toothpick comes out clean. Cool for 20 minutes in pan on wire rack, then transfer to wire rack to cool completely.

Recipe by Bakelette Adapted from The Flour Sack 
Print Recipe Here